

Usage
Everything is under Products → Serial numbers, with four sections: Serial numbers (the register), Goods receipts, Warranty claims and Import & export.
1. Record incoming stock
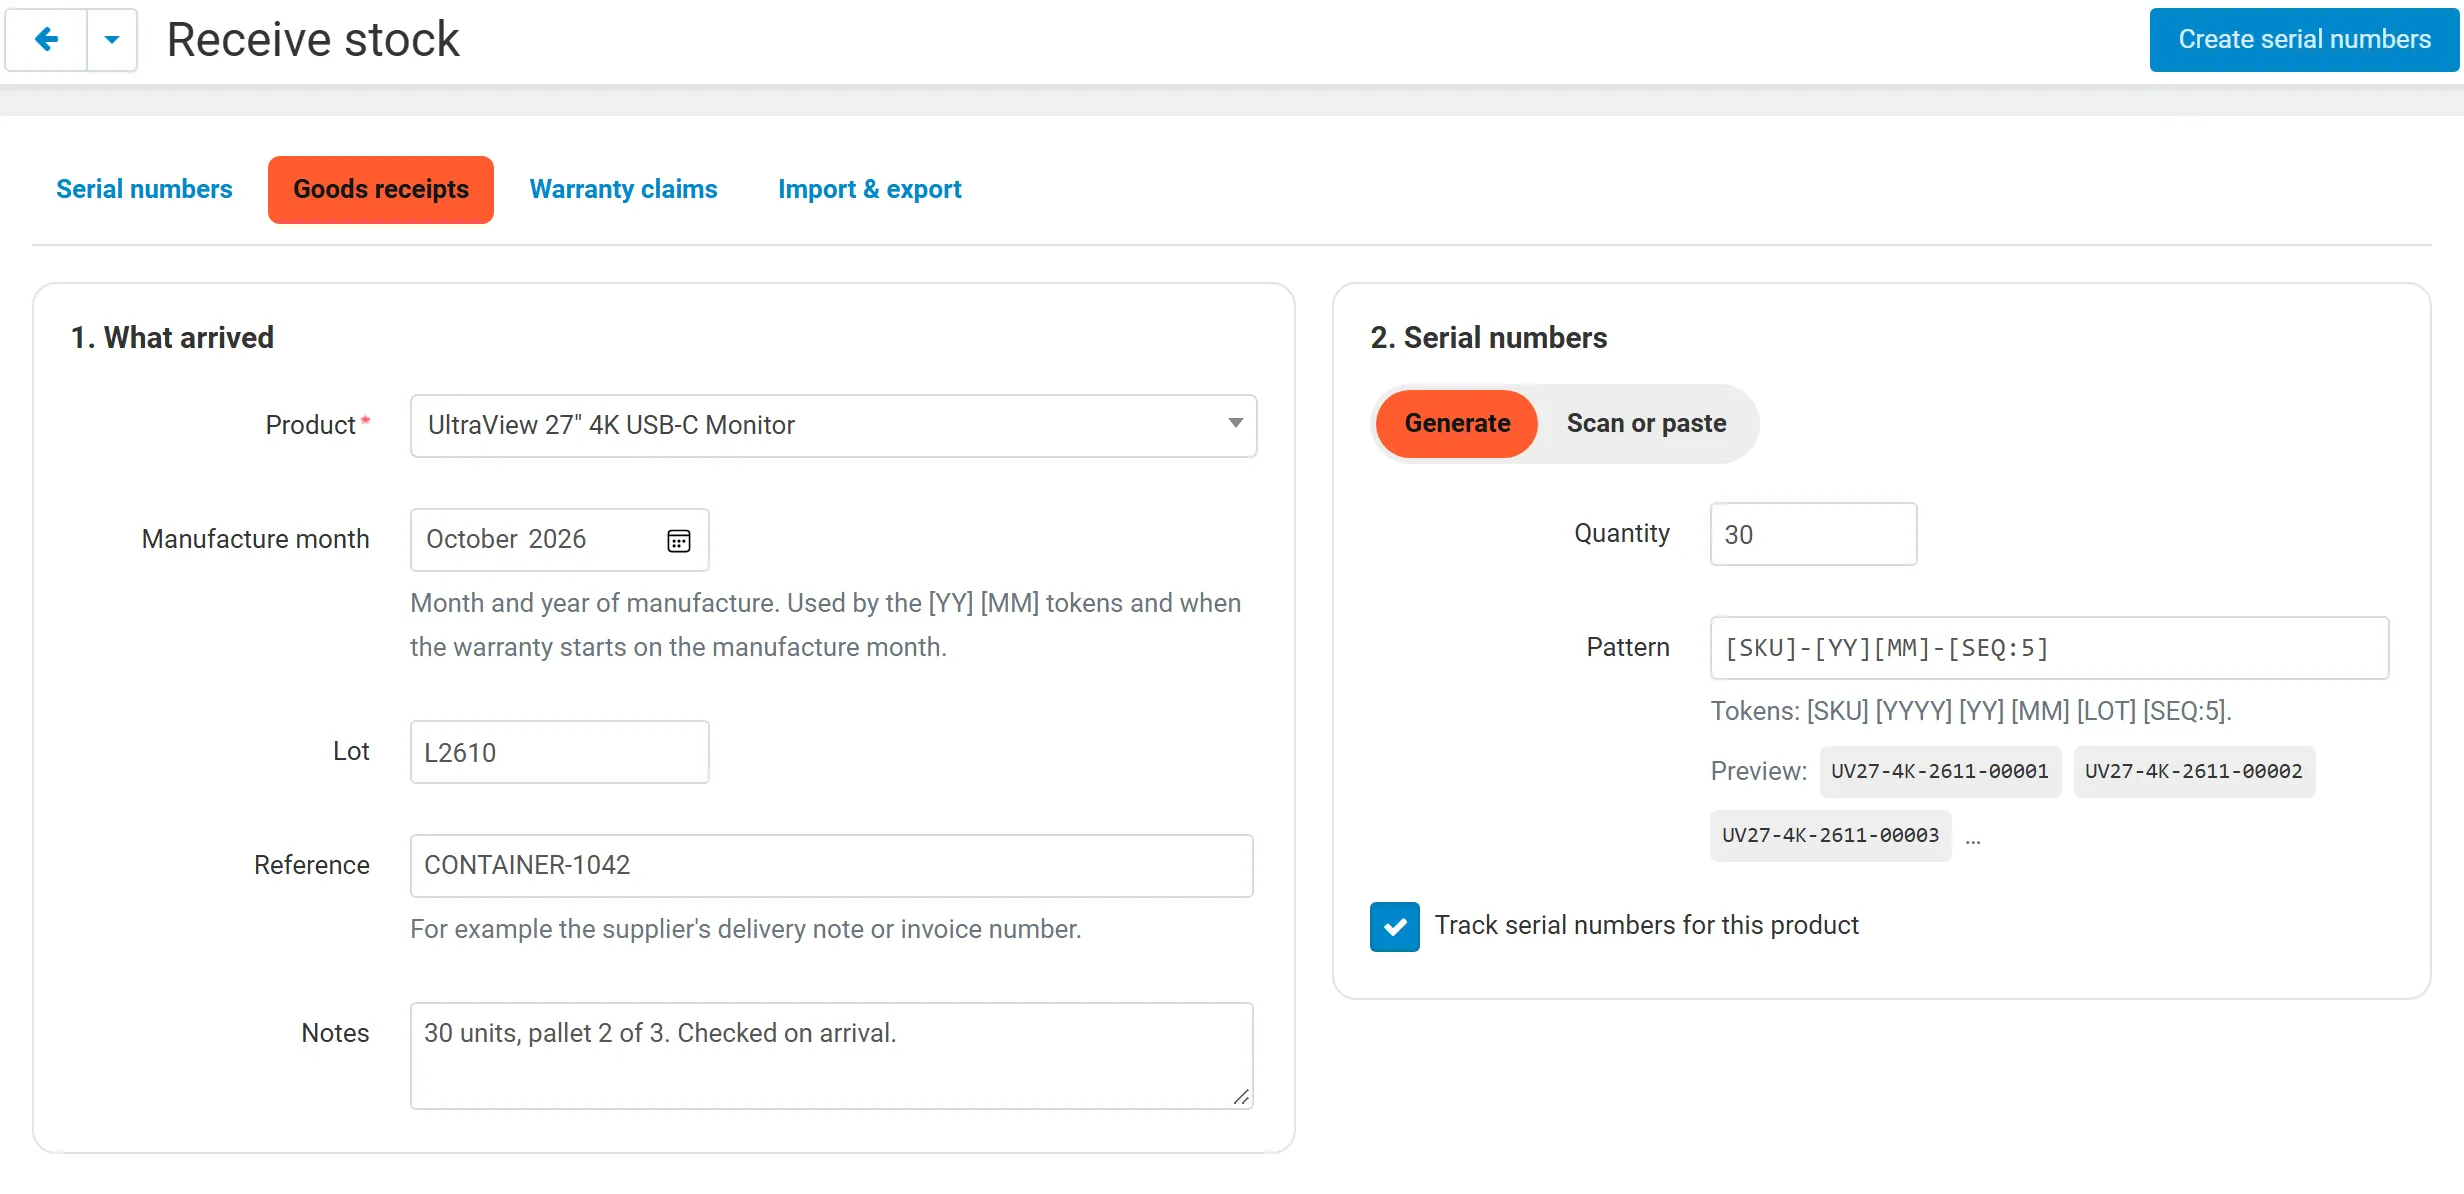
Section titled “1. Record incoming stock”- Click + (Receive stock), or Receive stock on the product’s Serial numbers & warranty tab.
- What arrived: choose the product, the manufacture month (month and year from the factory sticker), and optionally the lot and a reference such as the supplier’s delivery note, container or invoice number.
- Serial numbers: choose Generate and enter the quantity, or Scan or paste (see step 2 below).
- Click Create serial numbers. The register opens filtered to the new receipt.
Goods receipts lists every receipt with its date, product and product code, lot and manufacture month, reference and units (in stock / sold), with a link to print its labels.
2. One serial number per unit, with a label
Section titled “2. One serial number per unit, with a label”Generate: the pattern makes one serial number per unit, for example UV27-4K-2609-00001 … UV27-4K-2609-00006 for six monitors made in September 2026. The preview shows the first numbers before you save.
Scan or paste: click the dashed field and scan each unit’s barcode; the scanner’s Enter adds the code to the list, and a code that is already in the list flashes instead of being added twice. You can also paste a list (one per line, or separated by commas, semicolons or tabs). Spaces inside a code are removed. Serial numbers that already exist in the register are skipped and reported.
Serial numbers are unique per store (per vendor on Multi-Vendor) and may hold up to 64 characters without spaces.
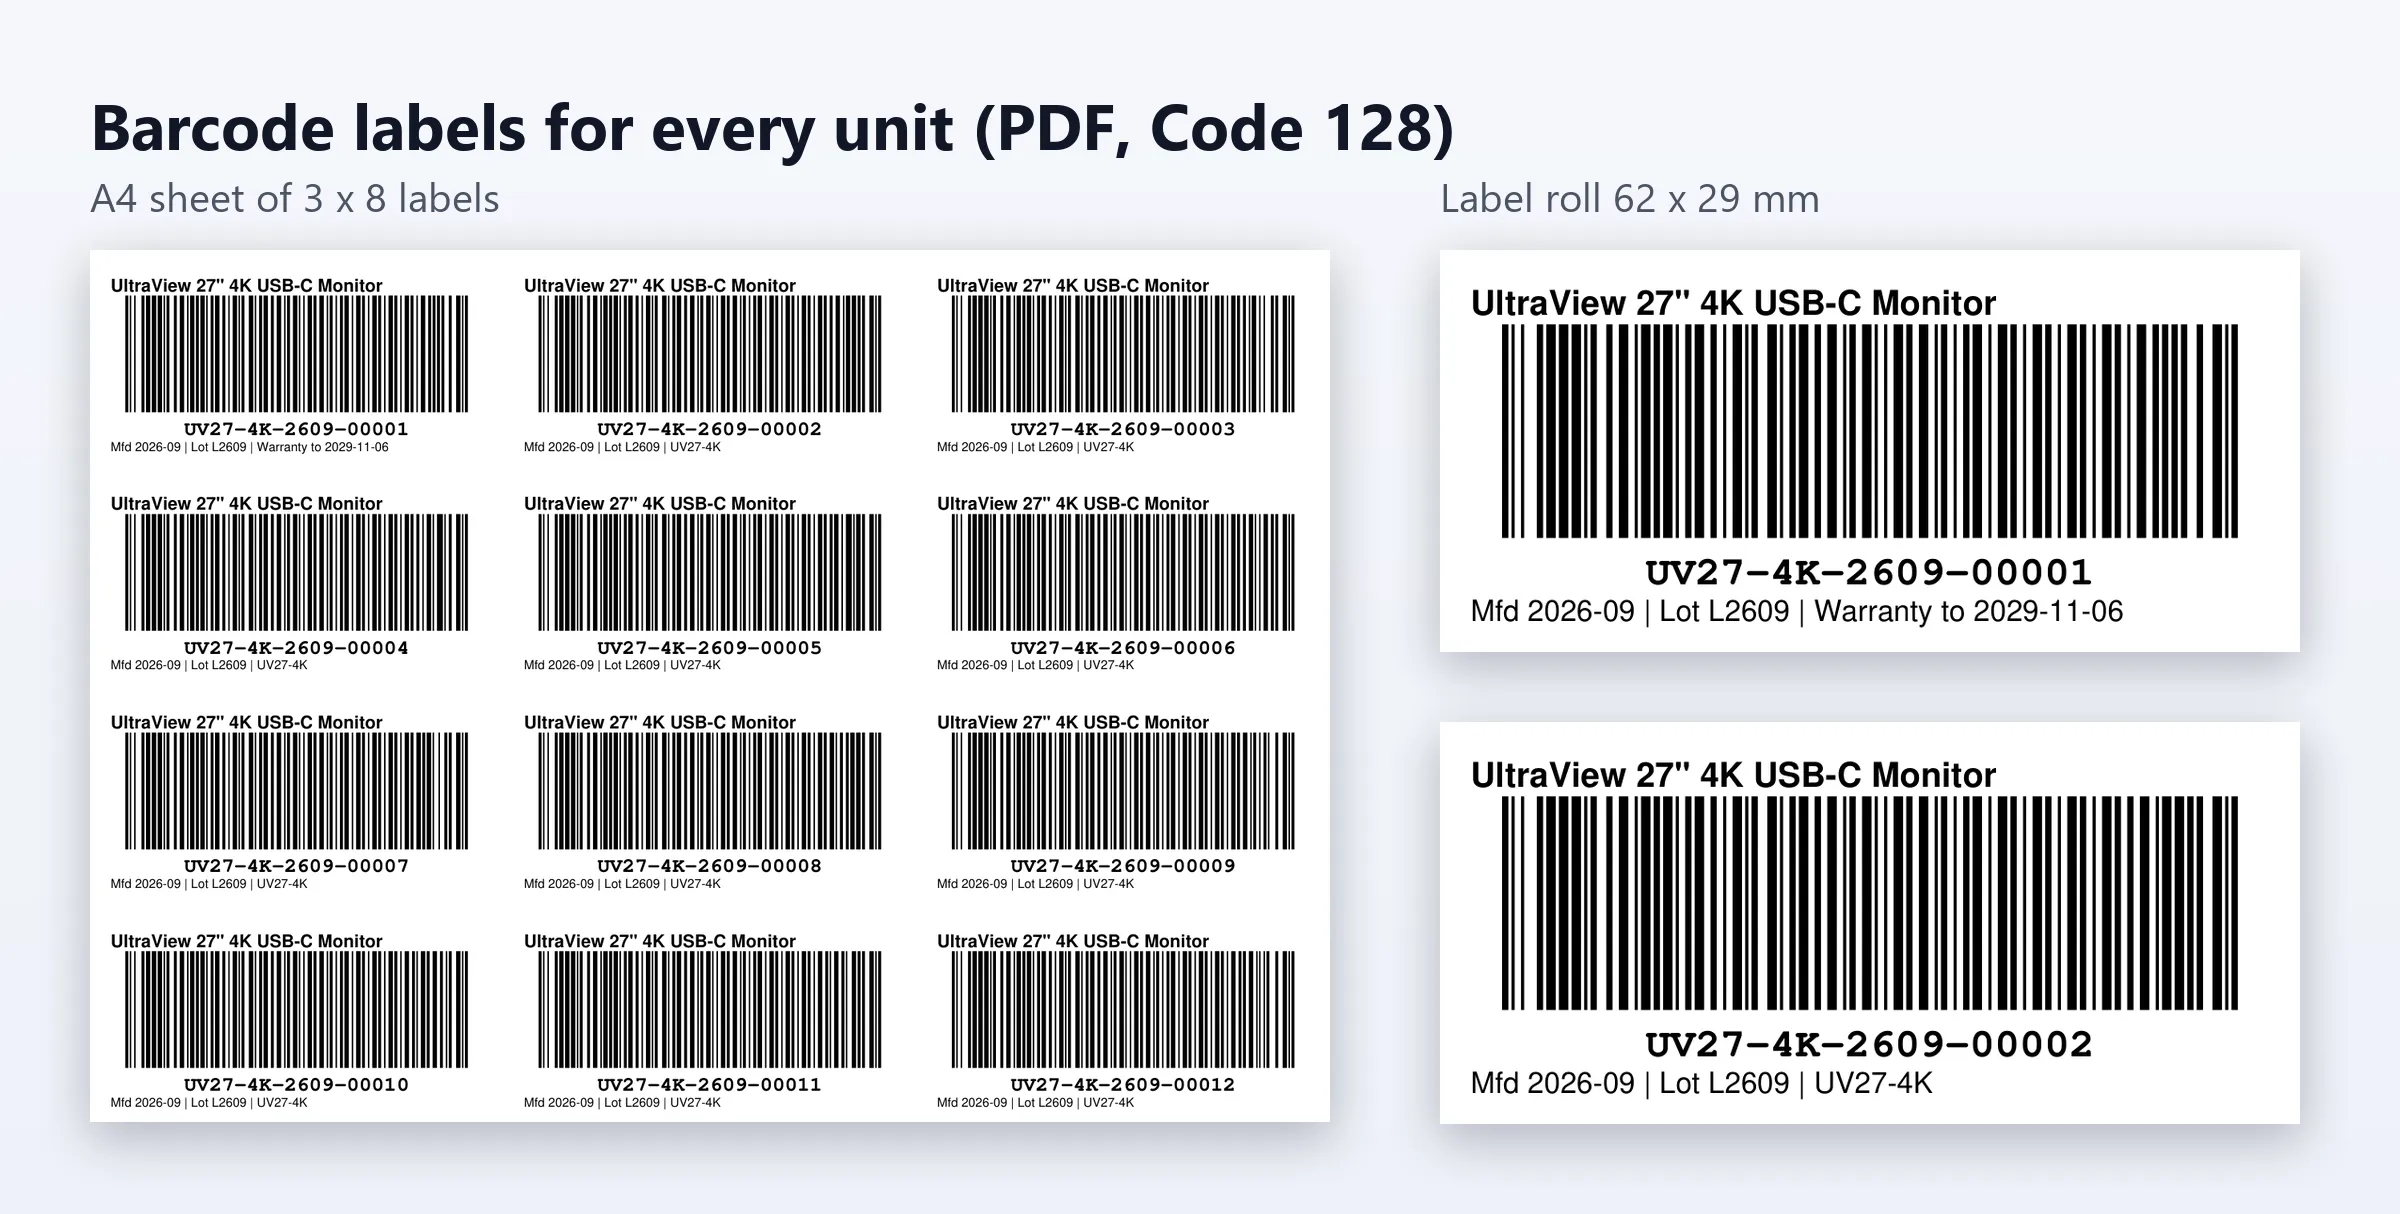
Labels: print a PDF of barcode labels from a goods receipt, from an order, from a unit’s page, or for the units you tick in the register (gear menu → Print labels of selected; choose the Label size below the list first):
| Label size | Use |
|---|---|
| Label roll 62 x 29 mm | Brother QL and similar label printers, one label per page |
| Label roll 50 x 25 mm | Thermal label printers, one label per page |
| A4 sheet, 3 x 8 labels | 70 x 37 mm self-adhesive sheets on an office printer |
Each label shows the product name, a Code 128 barcode of the serial number, the serial number in plain text and the manufacture month, the lot or the warranty end. Print at 100 % (no “fit to page”).
3. Link serial numbers to the order at dispatch
Section titled “3. Link serial numbers to the order at dispatch”Automatically (default): when you create a shipment for an order, the shipped units of every tracked product get serial numbers from stock, oldest first. A second shipment fills the remaining units. With the setting When the order gets one of the statuses below, all units get serial numbers when the order reaches one of the chosen statuses (Complete by default).
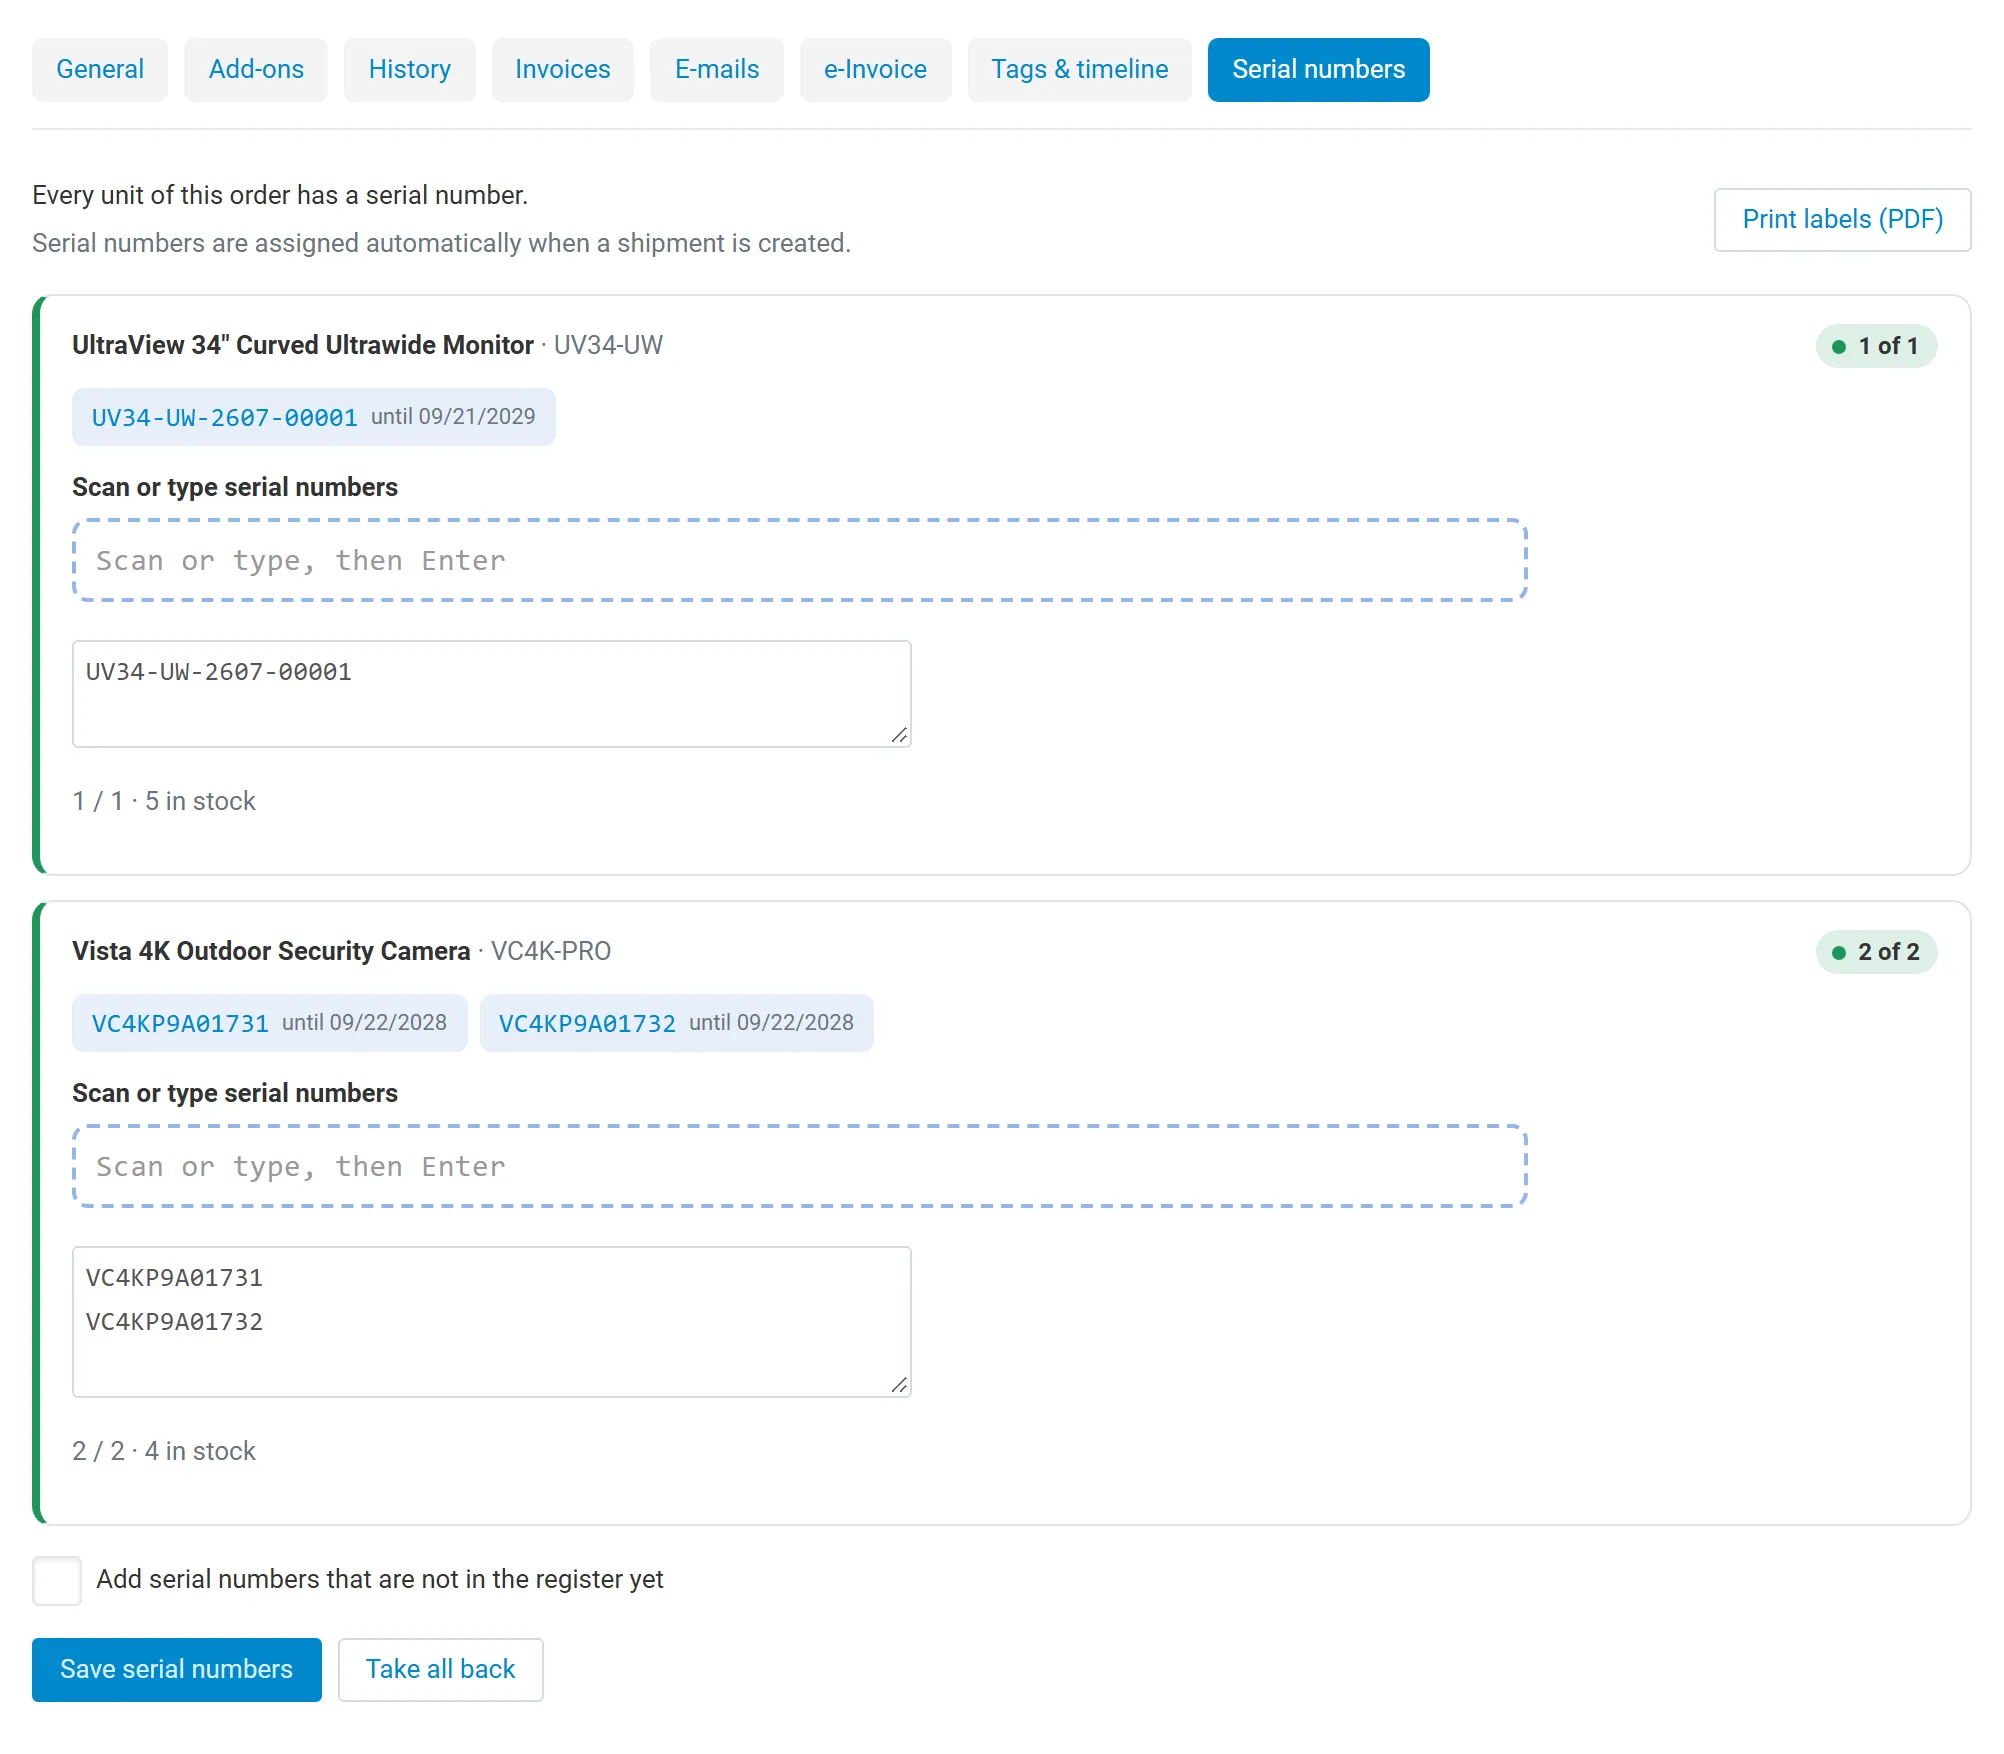
By scanning: open the order, tab Serial numbers. Each tracked line shows how many units have a serial number (for example 1 of 2). Scan or type the serial numbers into the line (suggestions list the units in stock), then click Save serial numbers. Removing a serial number from the list takes it back into stock. Assign from stock fills the missing units automatically; Take all back releases every serial number of the order. Tick Add serial numbers that are not in the register yet to accept manufacturer serial numbers you did not receive beforehand.
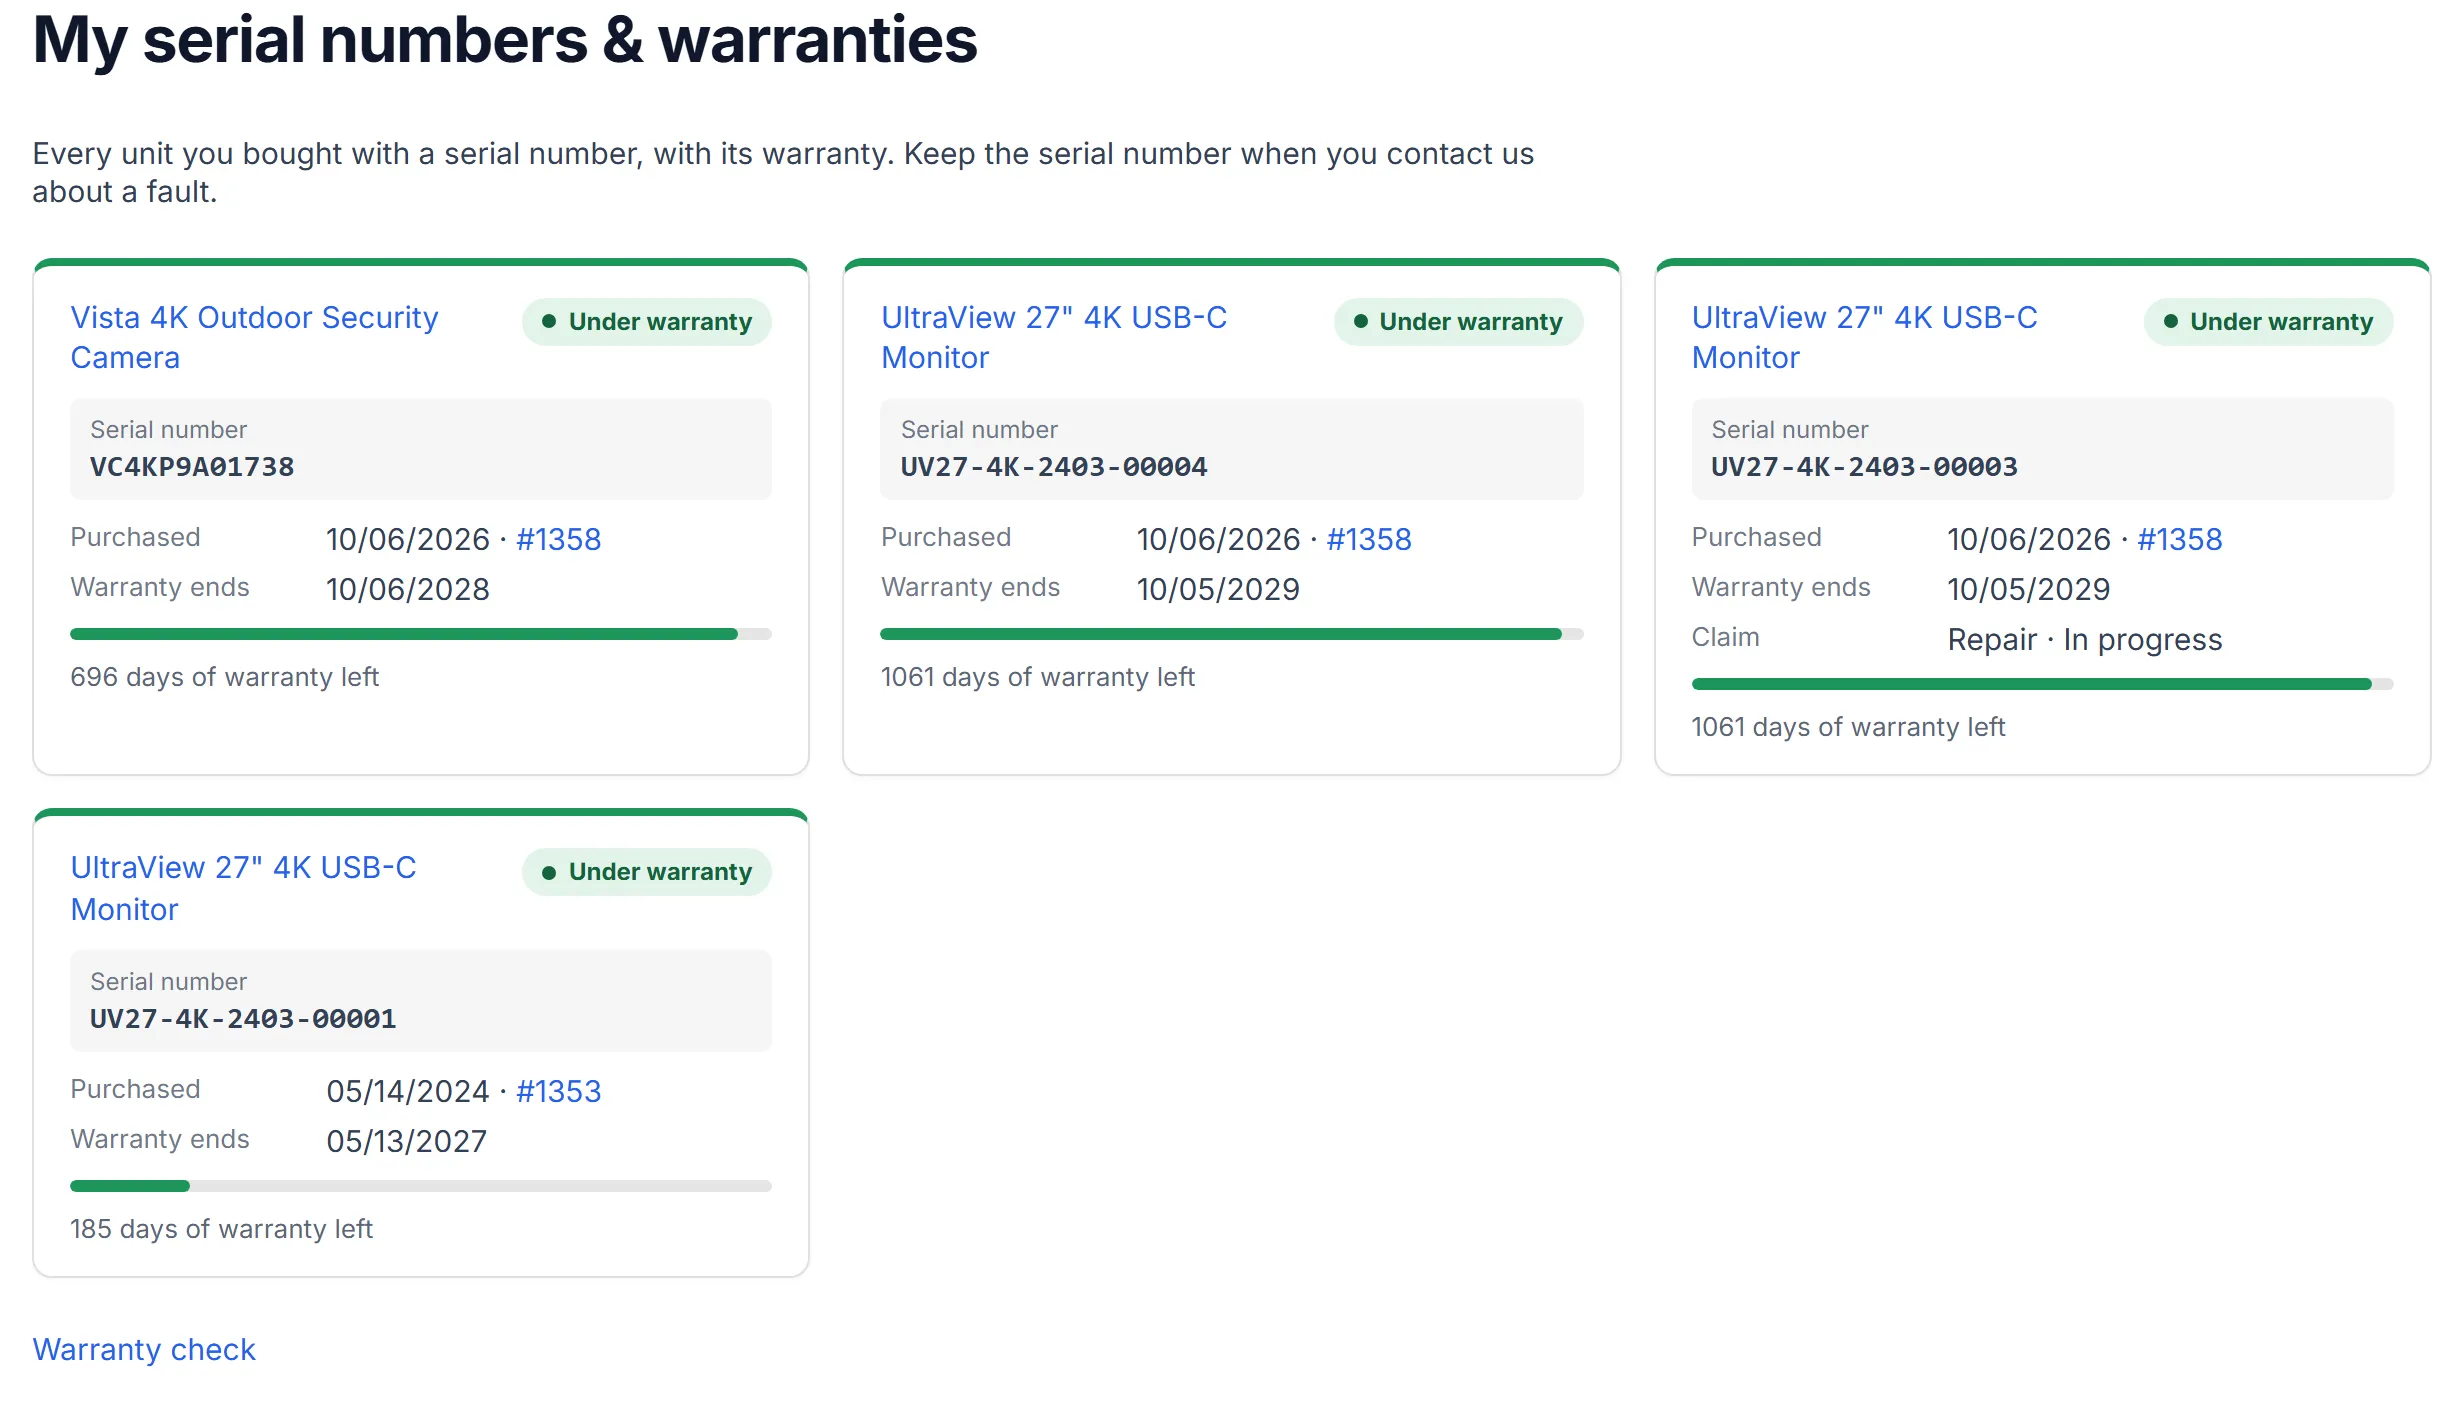
Units that were replaced under warranty or returned stay on the order tab as read-only history (status Replaced or Returned); only the units that are sold count towards the quantity of the line.
When an order is cancelled (statuses in Order statuses that release serial numbers) or deleted, its serial numbers go back to stock.
Orders Admin Pro: when the Kavio Labs Orders Admin Pro add-on is active, every assignment, release and claim status change is added to the order’s timeline.
4. Find a unit’s sale and customer
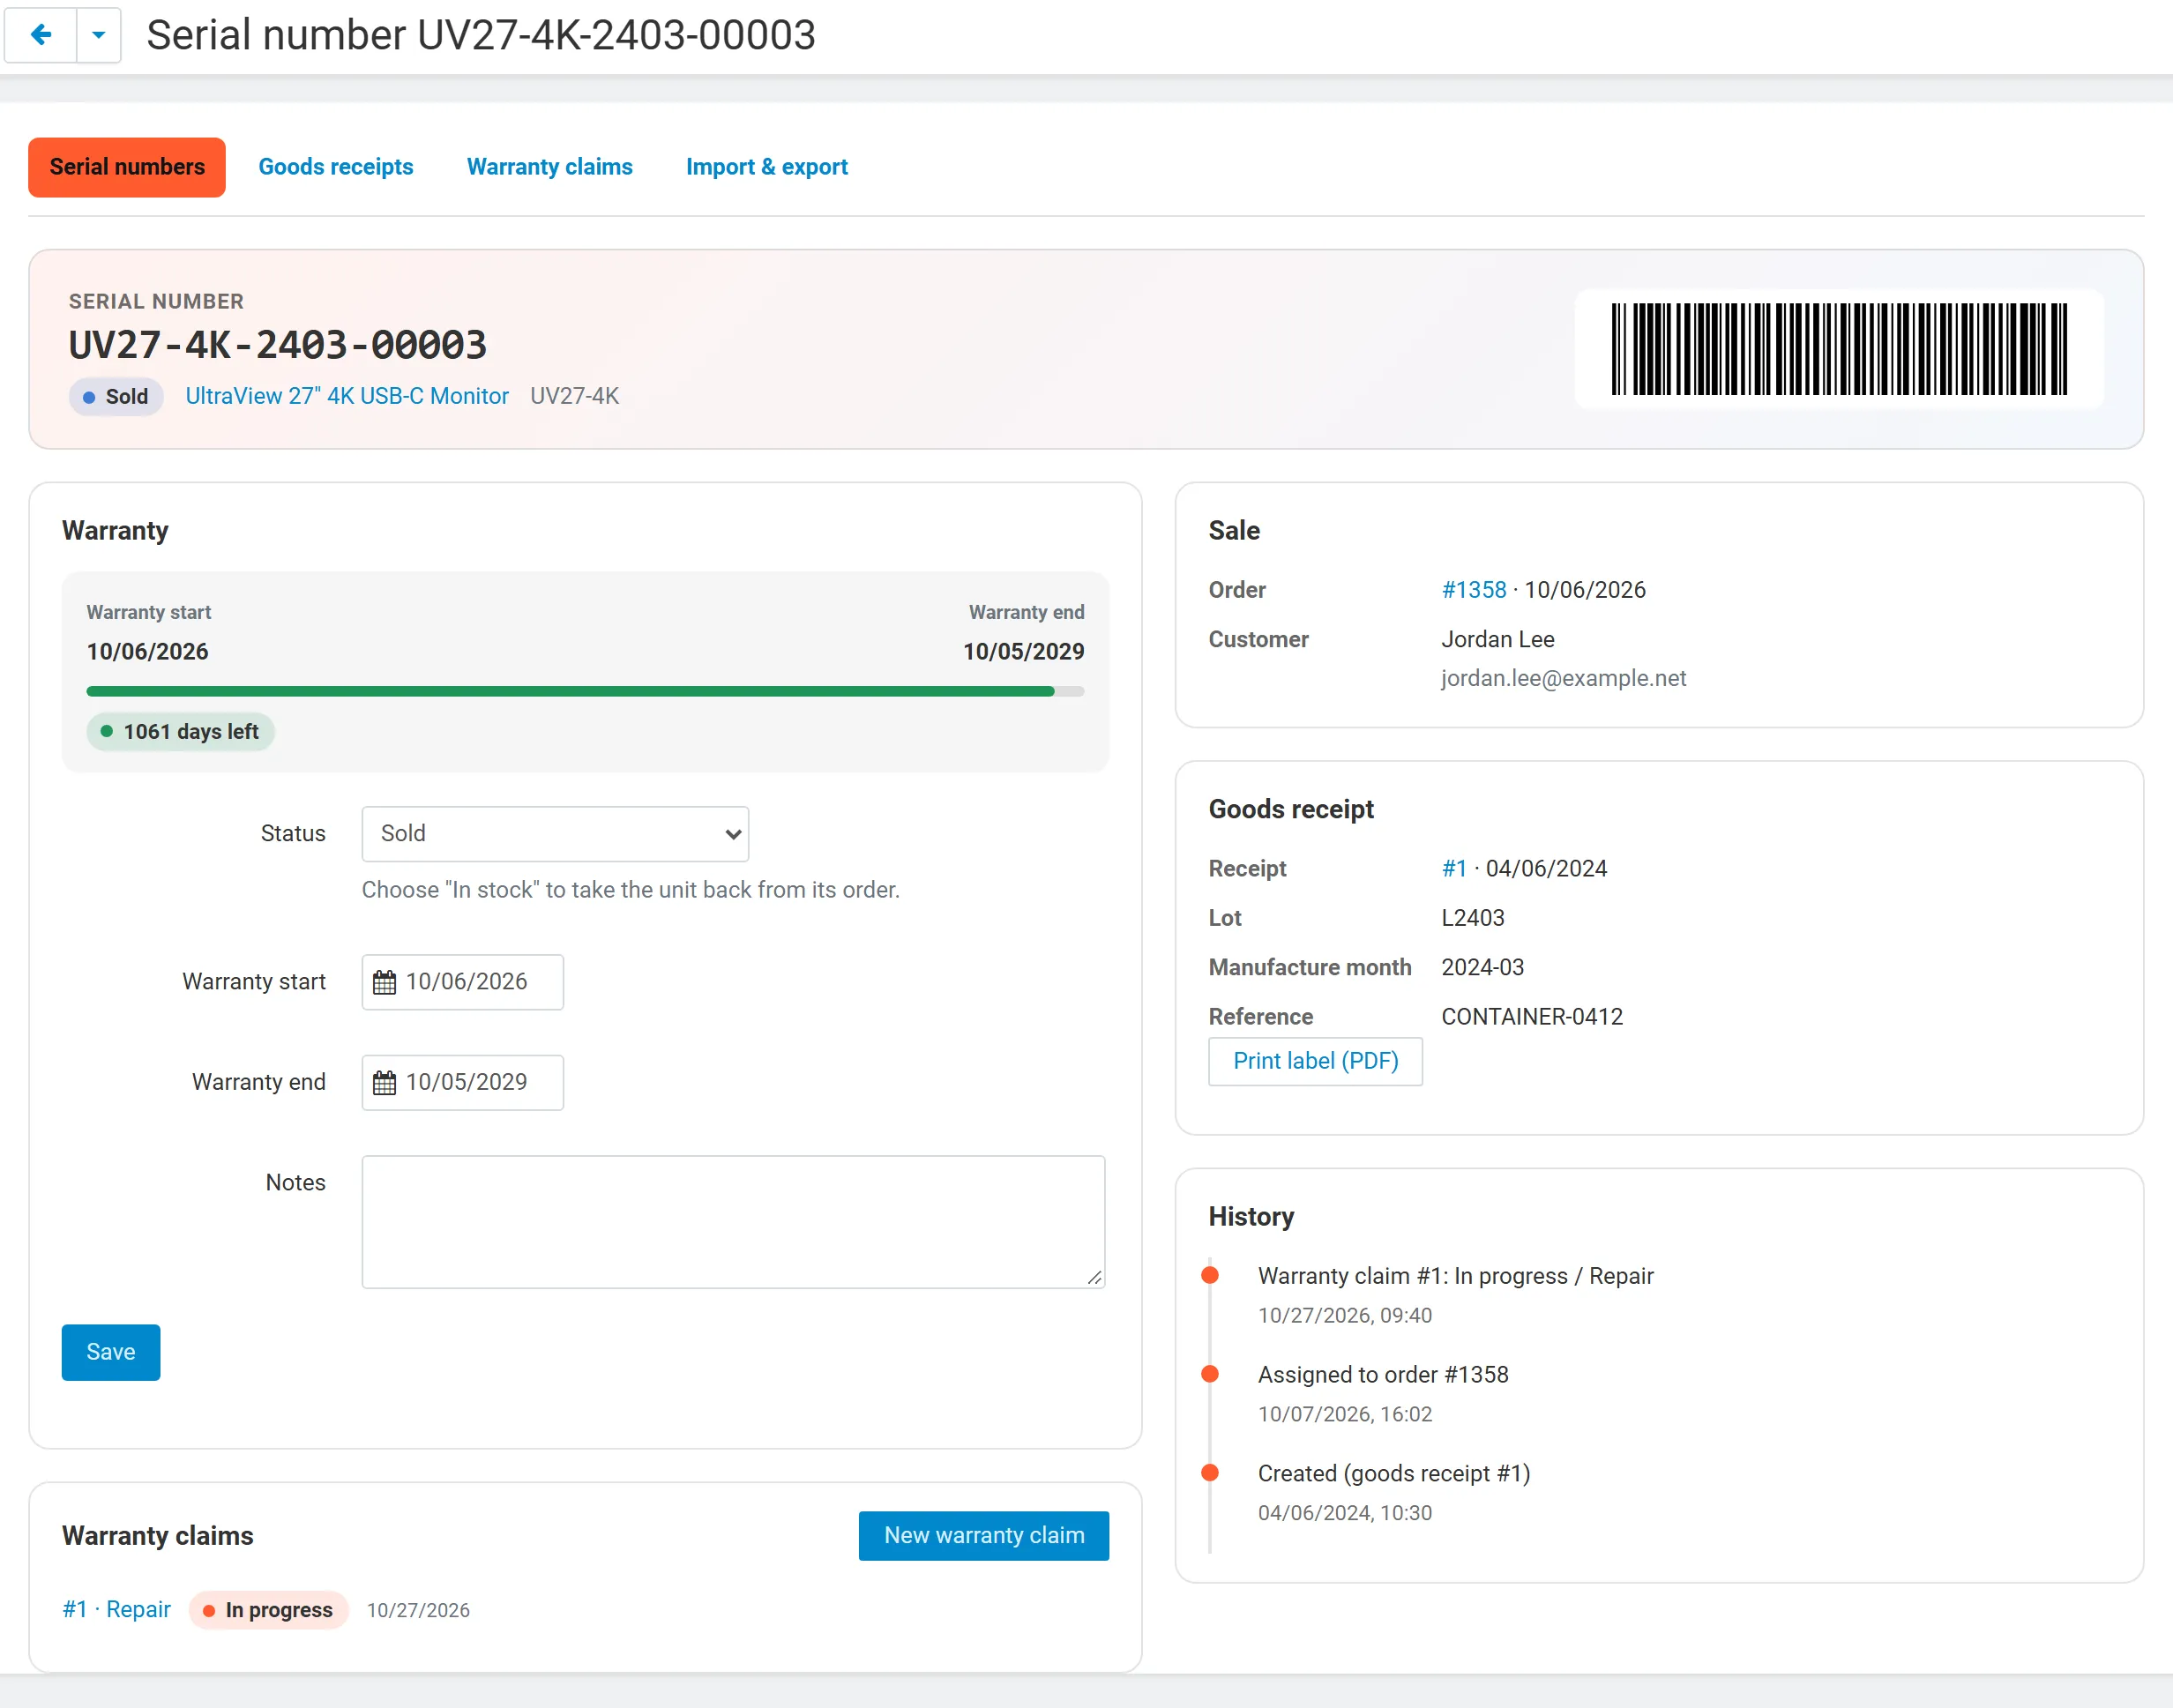
Section titled “4. Find a unit’s sale and customer”In the register, scan or type a serial number in the search field: the row shows the product, lot and manufacture month, the order with its sale date, the customer’s e-mail and the warranty end with the days left. Click the serial number for the unit page: barcode, sale (order, date, customer), goods receipt, warranty bar, claims, return requests of the order and the history of every change.
Repeat buyers: type the customer’s name or e-mail in Customer to list all their units across all orders. A customer who bought the same model in 2024 and again in 2026 sees two rows with different serial numbers, orders, sale dates and warranty ends, so each unit resolves to the right purchase.
Other filters: order ID, status (in stock, sold, returned, replaced, void) and warranty (under warranty, ends soon, expired, no warranty). The KPI cards at the top open the matching lists.
5. Warranty returns and replacements
Section titled “5. Warranty returns and replacements”- Open the unit’s page and click New warranty claim.
- Choose the type (Repair, Replacement, Refund, Inspection), describe the fault and save. Claims of units whose warranty has ended are flagged Out of warranty.
- Link the claim to a return request of the core RMA add-on, or to a withdrawal of the Kavio Labs Returns Portal, when the order has one.
- Move the claim through Open → In progress → Approved / Declined → Closed, with a resolution note.
- Replacement: scan the serial number of the new unit (same product, in stock). When the claim is Approved or Closed, the units are swapped: the old serial number becomes Replaced, the new one is sold on the same order line to the same customer and keeps the remaining warranty of the old one. Both units keep their history (“Replaced by …” / “Replacement for …”). You can enter the new unit while the claim is still open: it is remembered and swapped in when you approve or close the claim, without scanning it again. Checking the old serial number on the warranty check page tells the customer that the unit was replaced and to use the serial number of the replacement.
- Refund: closing a refund claim marks the unit as Returned.
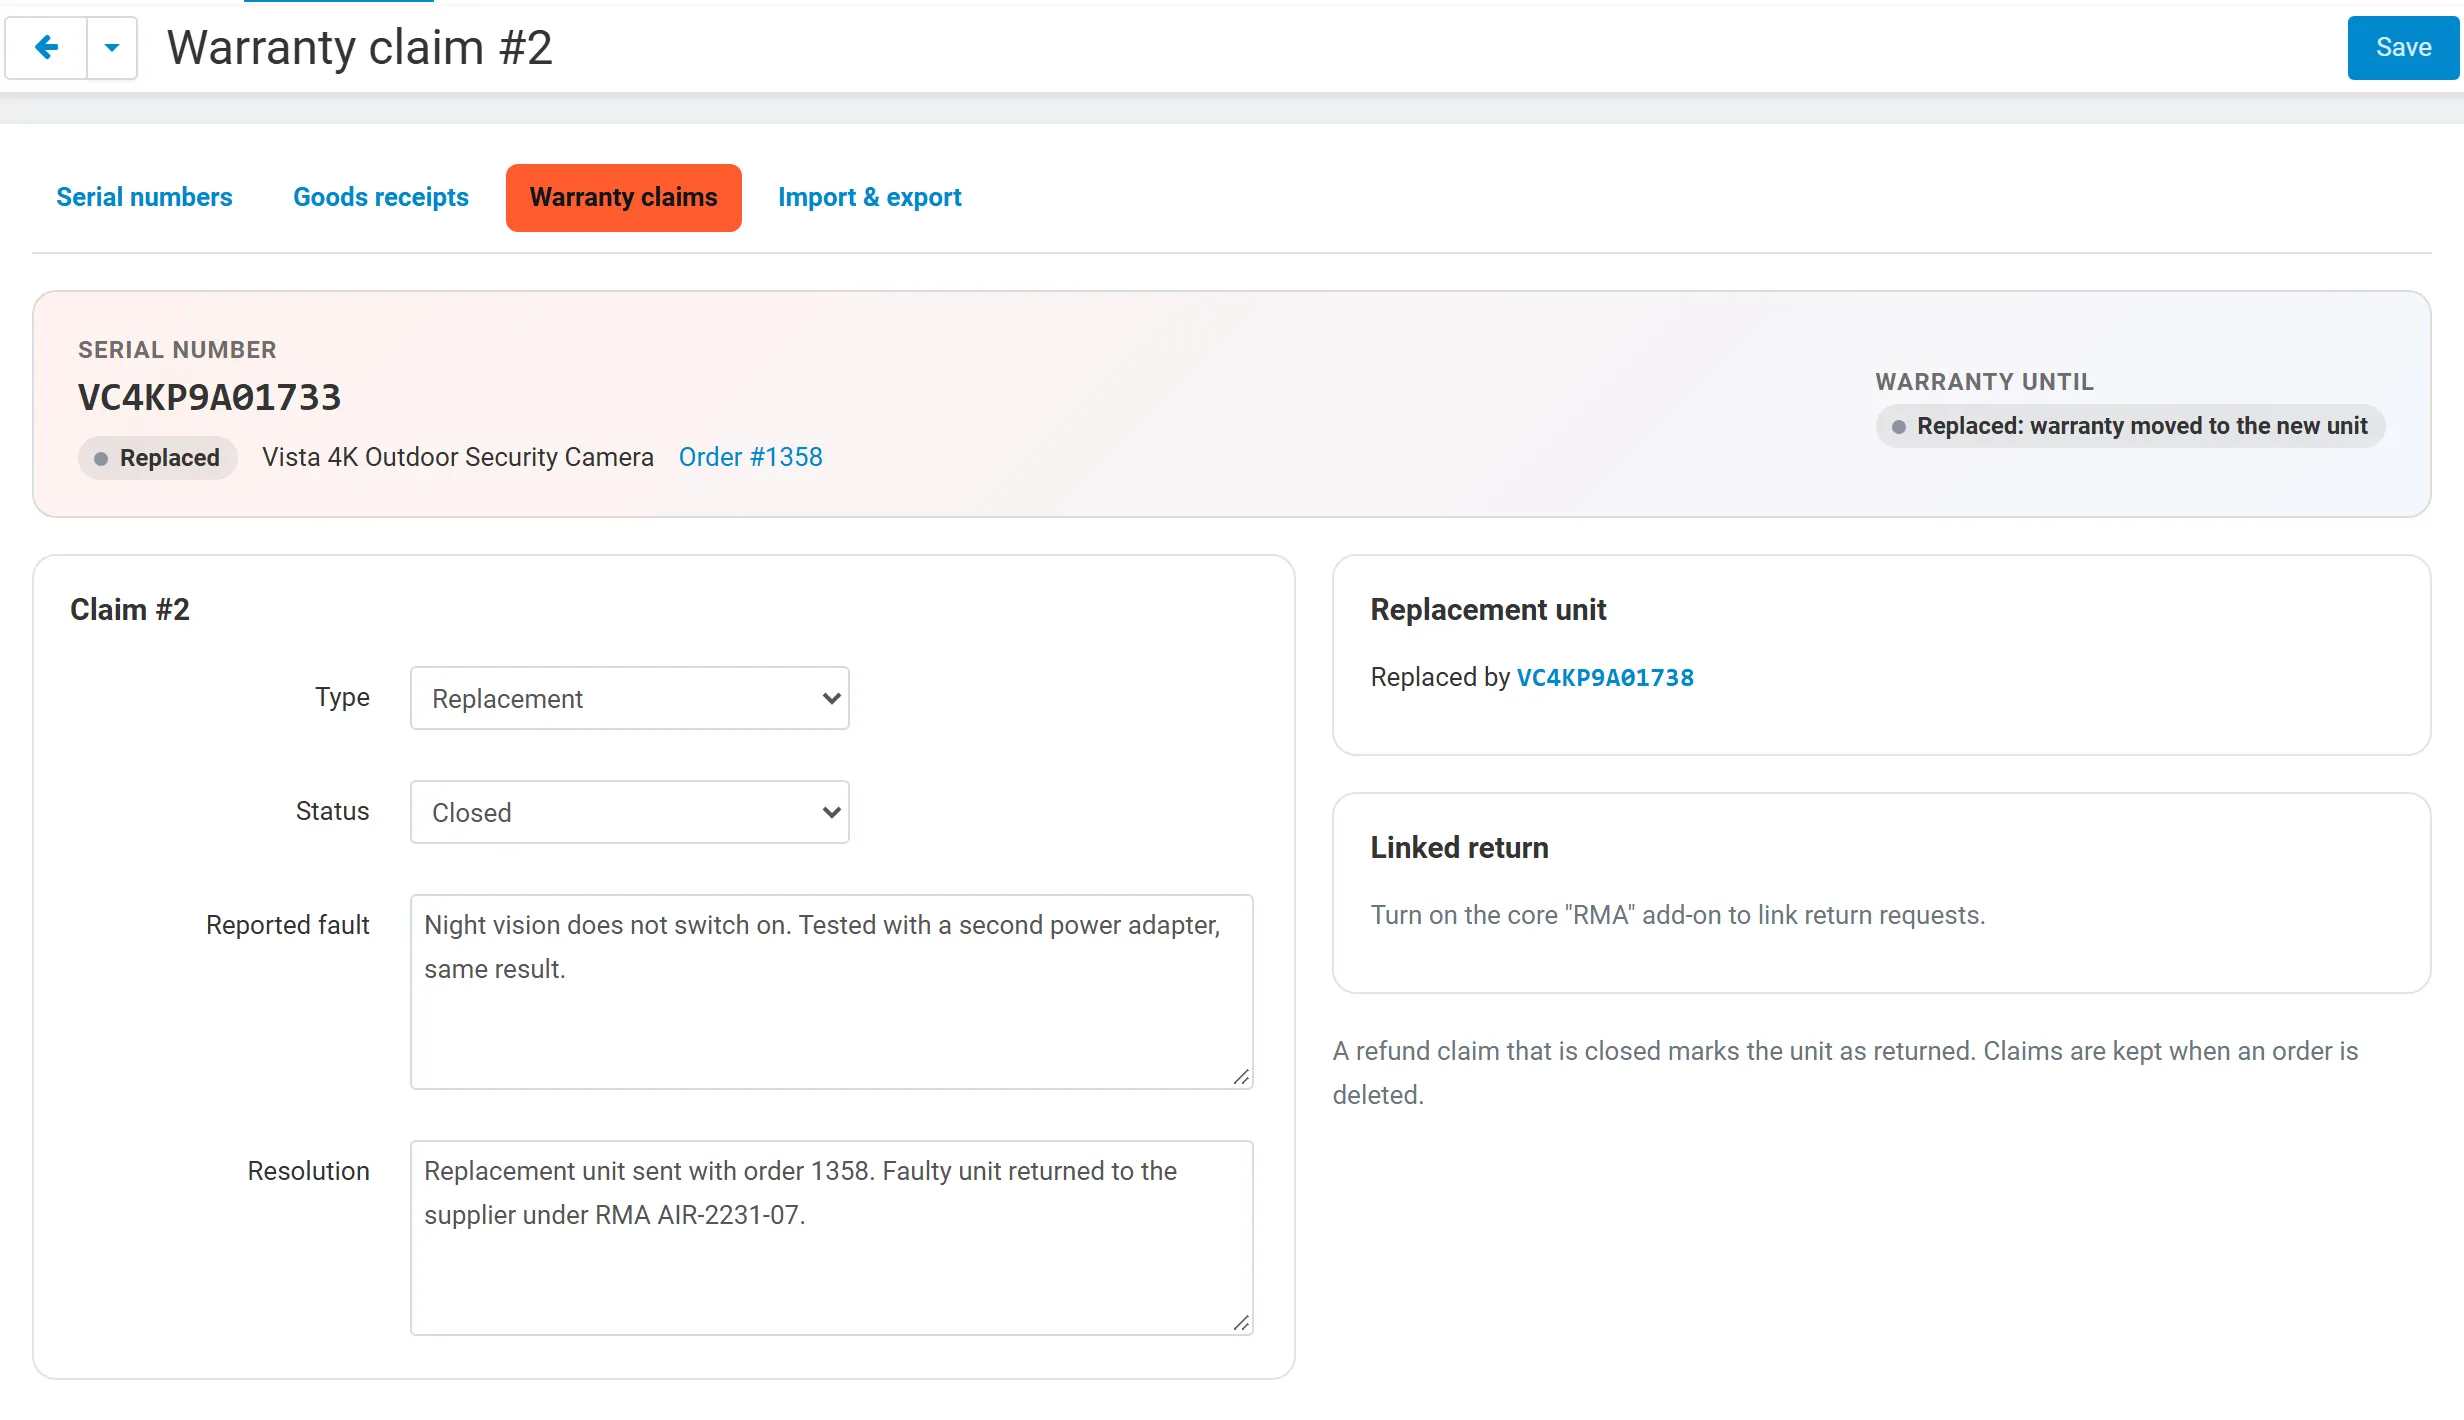
The Warranty claims section lists open and in-progress claims by default; filter by status, type or serial number.
Unit statuses
Section titled “Unit statuses”| Status | Meaning |
|---|---|
| In stock | Received, not sold. Can be assigned to an order. |
| Sold | Linked to an order line and a customer; the warranty runs. |
| Returned | Taken back (refund claim closed, or marked by hand). Mark it In stock to sell it again. |
| Replaced | Swapped for another unit in a replacement claim. |
| Void | Damaged, lost or scrapped; never assigned. |
Bulk actions in the gear menu: Mark as in stock, Mark as returned, Mark as void, Delete selected (only units that were never sold and have no claim can be deleted).
Customer pages
Section titled “Customer pages”- My serial numbers & warranties (account menu): one card per unit with the product, serial number, purchase date and order, warranty end, a bar of the warranty left and the status of a claim.
- Order page: the serial numbers and warranty under each product line.
- Warranty check (
index.php?dispatch=kv_serial_warranty.check): anyone enters a serial number and sees the product and whether it is under warranty; no customer data is shown.
Import and export
Section titled “Import and export”Import & export → Import CSV: upload or paste a CSV with a header row. Required columns: serial, product_code. Optional: lot, mfg_month (YYYY-MM), status (available, returned, void), warranty_end (YYYY-MM-DD), notes. New serial numbers are added in stock, one goods receipt per product and lot. Tick Update serial numbers that already exist to change the status, warranty end and notes of existing units. Errors are listed per line.
Export CSV (gear menu of the register) exports the current filter with the columns serial, product_code, product, lot, mfg_month, status, order_id, customer_email, sold_at, warranty_start, warranty_end, notes.