

Configuration
Setup has three parts: a payment method in CS-Cart, the PayTR merchant panel, and (optionally) the add-on settings for the installment table and Multi-Vendor transfers.
1. Create the payment method
Section titled “1. Create the payment method”- Go to Administration → Payment methods and click +.
- Enter a name, for example “Credit / debit card (PayTR)”, and on the Configure tab choose the processor:
- PayTR iFrame: recommended for every store;
- PayTR Direct API (card form): only if PayTR enabled the Direct API for your account (see below).
- Fill in the settings described in the next table and save. In CS-Cart (Ultimate) select the storefronts; in Multi-Vendor the method can also belong to a vendor when you use Direct Customer-to-Vendor Payments.
Payment method settings
Section titled “Payment method settings”| Setting | Description |
|---|---|
| Merchant ID / Merchant key / Merchant salt | From PayTR Merchant Panel > Information (Bilgi). The key and salt are secrets: they sign every request and verify every notification. |
| Test mode | Sends test_mode=1. Payments are test transactions even when your PayTR store is live. Use PayTR’s test cards. Turn off for real payments. |
| Show PayTR error details | Sends debug_on=1, so PayTR shows integration errors on its pages. Useful during setup; turn off in production. |
| Notification URL (Bildirim URL) | Read-only. Copy this address into the PayTR merchant panel (step 2). |
| Currency | Customer currency: the currency the customer selected, if PayTR supports it, otherwise the primary currency. Or a fixed currency (TRY, USD, EUR, GBP, RUB, if that currency exists in your store). Amounts are converted with the store’s currency rates. Foreign currencies must be enabled for your PayTR account. |
| Language | Payment page language: the order language (Turkish for tr, English otherwise), or always Turkish / English. |
| Single payment only | Sends no_installment=1 (for example for products where installments are not allowed). |
| Maximum installments | max_installment: 2 to 12, or the account limit. |
| Installment fee paid by | Direct API only. Customer: the PayTR installment rate is added to the charged amount; the order total is not changed and the difference is stored as “Installment fee” in the payment details. Store: the customer pays the cash price in installments and you carry the fee. With the iFrame, PayTR applies the installment settings of your merchant panel. |
| Payment time limit | iFrame only, timeout_limit in minutes (default 30). |
| Order reference prefix | Letters and digits. Each attempt gets a unique PayTR reference (merchant_oid) like KV1234T1791755257AB12. Use a different prefix for every store that shares one PayTR account. |
| Order statuses | Successful payment (default Paid), Failed payment (default Failed), Awaiting confirmation (default Open; used when the customer returns before PayTR has confirmed, and for orders placed in the admin panel), After a full refund (optional). |
2. Set up the PayTR merchant panel
Section titled “2. Set up the PayTR merchant panel”-
Notification URL (Bildirim URL): in PayTR Merchant Panel > Settings (Ayarlar) > Notification URL, enter the URL shown in the payment method (also shown in the add-on settings). It looks like:
https://your-store.com/index.php?dispatch=payment_notification.notify&payment=kv_paytr_iframe- Use
https://if your store has SSL,http://if it does not. If you add or remove SSL later, update the URL in the PayTR panel. - One URL serves both processors (iFrame and Direct API) and every PayTR payment method of the store.
- If several stores share a PayTR account, only one notification URL can be set: use one PayTR account per store.
- Use
-
Do not restrict the notification URL. PayTR calls it from its own servers without a session. Do not protect it with HTTP authentication, a “store closed” maintenance page, a WAF rule or an IP allow-list. If your hosting firewall only lets known IP addresses reach the store, ask PayTR support for the addresses its notifications come from and allow them. The add-on answers exactly
OKto valid notifications; any other answer makes PayTR retry every minute and show the payment as “In progress” (Devam Ediyor). -
Test mode: a new PayTR store starts in test mode. Place a test order (the iFrame fills in the test card automatically; for the Direct API use card
4355 0843 5508 4358, expiry12/30, CVV000). In the merchant panel, Transactions (İşlemler) must show the payment as Successful (Başarılı). If it shows In progress, open the transaction’s Detail to see what your notification URL answered (see FAQ). After the test payment, request live mode from PayTR and turn off Test mode in the payment method. -
Payment links (optional): PayTR sends link payment results to the
callback_linkthe add-on submits with each link, so nothing has to be set in the panel. PayTR rejects callback URLs that containlocalhostor a port number. -
Multi-Vendor transfers (optional, see Usage): enter the Platform transfer result notification URL from the add-on settings in Settings > Platform Transfer Result Notification URL (Platform Transfer Sonucu Bildirim URL).
3. Add-on settings
Section titled “3. Add-on settings”Add-ons → Manage add-ons → PayTR Payments → Settings
General
Section titled “General”| Setting | Default | Description |
|---|---|---|
| PayTR payment methods | Overview: each PayTR payment method, whether the credentials are set, test mode, and the installment rates cache. Refresh installment rates fetches the rates again. | |
| Show the installment table on product pages | Off | Adds a collapsible installment table under the product details, from the rates of the first active PayTR payment method of the storefront. |
| Collapse the installment table by default | On | The table opens on click. |
| Show the maximum number of installments at checkout | On | “Up to N installments with credit cards.” under the PayTR payment method. |
Marketplace transfers (Multi-Vendor only)
Section titled “Marketplace transfers (Multi-Vendor only)”| Setting | Default | Description |
|---|---|---|
| Pay vendors with PayTR platform transfers | Off | Requires a PayTR Marketplace (Pazaryeri) agreement. |
| Queue a vendor transfer when the vendor order gets status | Complete | The transfer is queued when a PayTR-paid vendor order reaches this status. |
| Send queued transfers | Automatically (cron) | Automatically: the cron command sends transfers when they are due. Manually: an administrator sends them from the order page or the PayTR transactions page. |
| Record completed transfers as withdrawals in the vendor balance | On | When PayTR confirms a transfer, a completed Withdrawal is added to the vendor’s accounting, so the vendor balance shows the money as paid out. |
| Vendors can edit their bank account | On | Vendors can enter their account holder and IBAN on their profile, Add-ons tab. |
| Cron command | Shown below the table. Run it every weekday morning before 10:00 (PayTR pays instructions received before 10:00 the same day). |
Cron command:
php /path/to/store/admin.php --dispatch=kv_paytr_payments.process_transfersLicense
Section titled “License”The license status is shown in a License card at the top of the add-on page, above the tabs, so you see it on every tab. The License tab holds the key itself. The key is stored once for the whole installation (not per storefront).
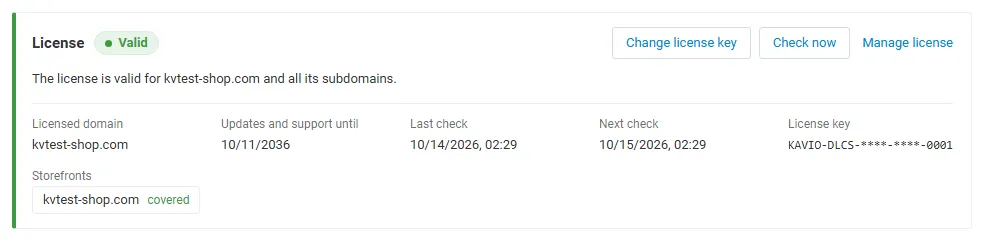
The License card shows:
- the status in color: green when valid, blue for a development host or the 14-day period before a key is required (with the days left), amber when the license server could not be reached (with the days left) or a Marketplace number is still being verified, red when the add-on is switched off;
- in plain words what the status means and, when the add-on is (or will be) switched off, what stops: PayTR is no longer offered at checkout and the product page installment table is hidden; payments that have already started, notifications, refunds, payment links and vendor transfers of existing orders keep working;
- the licensed domain, every storefront with its result (covered, development host, not covered), the end of the updates and support period, the last and the next check, and the key in use (masked);
- the actions Enter license key / Change license key (opens the License tab), Check now (verifies at once and stays on the page), Manage license (your licenses on cs-cart.kaviolabs.com) and, without a valid license, Buy a license.
In Add-ons → Manage add-ons the add-on’s row shows a small license badge next to its name, for example License: Valid or License: Pending · 9 days left. The add-on’s own admin pages show the same status in a small bar at the top.
| Setting | Description |
|---|---|
| License key | Your Kavio Labs license key (KAVIO-XXXX-XXXX-XXXX-XXXX, from My licenses on cs-cart.kaviolabs.com) or your CS-Cart Marketplace license number. If you entered the Marketplace license number in Add-ons → Manage add-ons (the add-on’s license field), leave this empty: the add-on uses that number. |
| License status | Points to the License card and explains what the check sends. |
What the license covers. A license is bound to the base domain you entered at purchase (for example example.com) and covers every subdomain of it (www.example.com, shop.example.com, staging.example.com). Local development hosts are always allowed: localhost, 127.0.0.1 and other private IP addresses, and host names ending in .localhost, .test, .local, .example or .invalid. A store on a different base domain needs its own license. If you move your store to a new domain, contact support.
When the add-on checks. When you save the key, and then once a day. The check runs only in the admin panel (on a page you open) or from cron, never while customers browse the storefront, and takes a few seconds at most. A cron job keeps the license verified even when nobody opens the admin panel:
php /path/to/store/admin.php --dispatch=kv_paytr_payments_license.checkWhat is sent. The check sends this to https://cs-cart.kaviolabs.com and nothing else: the license key, the add-on ID and version, the host names of your storefronts, your CS-Cart version and edition, and a random one-time value. No customer, order or personal data is sent. The server answers with a digitally signed result, so a forged answer is ignored.
Statuses.
| Status (card) | Color | What happens |
|---|---|---|
| Valid | Green | The license is valid for this domain. Everything works. |
| Development host | Blue | The store runs on a local development host, which every license covers. Everything works. |
| Pending verification | Amber | A CS-Cart Marketplace license number was accepted, but the Marketplace has not confirmed it yet. Everything works. |
| Pending · N days left | Blue | No verified key yet (a new installation, or right after upgrading from 1.0.x). Everything works for 14 days. |
| Grace period · N days left | Amber | The last checks failed (for example a network problem). The add-on keeps working for 14 days after the first failed check. |
| Partly valid | Amber | (CS-Cart with several storefronts) Some storefronts run on another base domain. PayTR is hidden at checkout, and the installment table on product pages, on those storefronts only. |
| Not activated, Invalid key, Revoked, Domain mismatch, Not verified | Red | The PayTR payment methods are no longer offered at checkout, and the product page installment table is hidden. Payments that have already started still complete, and existing orders are not affected: the payment and card pages, PayTR notifications (callbacks), status checks, refunds, payment links and marketplace transfers keep working. Domain mismatch shows the licensed domain next to the domain your store runs on. |
When your updates and support period ends, the add-on keeps working. Only updates and support stop.
License information appears in the admin panel only, and only for administrators who may manage add-ons; vendors (Multi-Vendor) and customers never see it. When the add-on is switched off, other admin pages also show a notice once per session with a link to the add-on page; the add-on page itself shows the card instead.
Direct API
Section titled “Direct API”Use the Direct API only if you need the card form on your own page:
- PayTR enables it for your account on request.
- The card form is rendered by your store, so your site is in PCI DSS scope (typically SAQ A-EP), even though the form posts the card data straight to PayTR and the card number, expiry and CVV never reach your server. The store only receives the first 8 digits (BIN) to look up the installment plans.
- HTTPS is required.
- Non-3D payments are not used; every payment goes through 3D Secure.
If in doubt, use the iFrame.