

Configuration
All settings are in Marketing → Mobile app. The phone on the right of each page shows your store as it looks in the app, with your colours and tab bar.
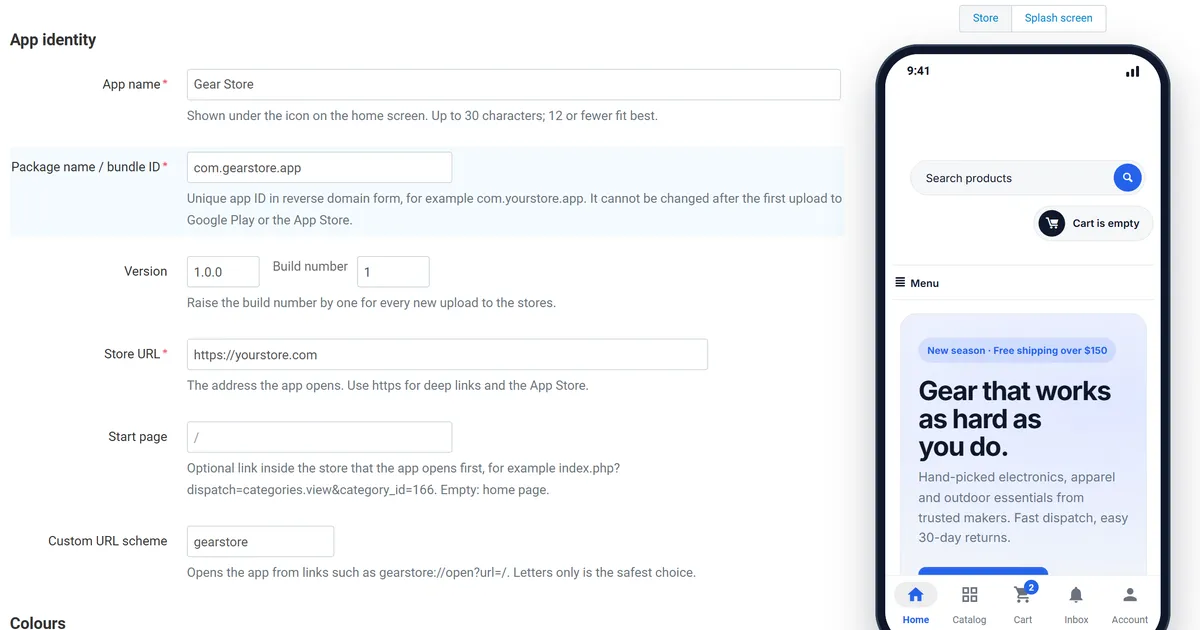
App design
Section titled “App design”| Field | Notes |
|---|---|
| App name | Under the icon on the home screen. Up to 30 characters; 12 or fewer fit best. |
| Package name / bundle ID | Reverse domain form, for example com.yourstore.app. It cannot change after the first upload to Google Play or the App Store. |
| Version and build number | Raise the build number by one for every upload. |
| Store URL | The address the app opens; use https for deep links and the App Store. |
| Start page | Optional link inside the store that opens first. |
| Custom URL scheme | yourstoreapp://open?url=/index.php?dispatch=checkout.cart opens a page in the app. |
| Colours | Brand colour, status bar, tab bar background, active and inactive tab, splash background, icon background. |
| App icon | Square PNG or JPEG, 1024 × 1024 recommended, no rounded corners. Every Android density, the adaptive icon, the round icon, the iOS icon and the store icons are generated from it. |
| Splash logo | Optional transparent PNG; without it the icon is used. |
Navigation
Section titled “Navigation”- Native tab bar: two to five tabs. Types: Home page, Catalog, Search, Cart (with badge), Account and orders, Wishlist (when the Wishlist add-on is on), Sellers (Multi-Vendor), Notification inbox (native screen) and Custom link. Untick all tabs for an app without a tab bar. Use the arrows to change the order.
- Hide these parts: CSS selectors, one per line, hidden only inside the app. The defaults hide the top panel and the footer of the Responsive theme. For other themes add their header or footer selectors. Keep a way to reach your privacy policy and account deletion page (an Account tab or a custom tab), app stores require it.
- Pull to refresh and the Share button on product pages (native share sheet with the product link).
- Also open inside the app: other domains that stay in the app when a shopper taps a link. Redirects that your checkout makes (payment pages, 3-D Secure) always stay in the app; other external links open in the browser.
- Prompts: on which launch the app asks for notification permission (Android 13+, iOS), and when it may show the native rating dialog (after an order, from a number of launches and days; at most every 90 days).
- Required app version: apps with a lower build number show a blocking “Update required” screen with a link to the store.
These settings reach installed apps through the live configuration at the next start; no new build is needed.
Push notifications
Section titled “Push notifications”- Create a free Firebase project at console.firebase.google.com with your Google account.
- Project settings → Service accounts → Generate new private key and upload the JSON file on the Push notifications page. The key is stored encrypted with your store’s key and never shown again. Test connection signs in to Firebase and shows OK.
- Add an Android app and an iOS app in Firebase with your package name and bundle ID; put
google-services.jsonandGoogleService-Info.plistinto the source project (see Usage). For iOS upload your APNs key in Firebase.
Order status pushes: tick the statuses that send a push (for example Processed and Complete) and edit the title and
text. Placeholders: [order_id], [status], [first_name]. A tap opens the order page.
Deep links
Section titled “Deep links”- Android App Links: paste the SHA-256 fingerprints of your app signing key (Google Play Console → App integrity) and of your upload key if you test locally signed builds.
- iOS Universal Links: your 10-character Apple Team ID and the bundle ID (empty = the package name).
- Paths:
*opens every store page in the app, or list paths such as/electronics/*. Admin, API and payment callbacks never open the app.
The page checks both association files of your store and shows OK when they answer.
Add-on settings
Section titled “Add-on settings”Add-ons → Mobile App Builder → Settings: the general on/off switch and the License tab.